The Part Most KDP Creators Skip: Let Research Pick the Niche (Then Build the Book Fast)
Feb 08, 2026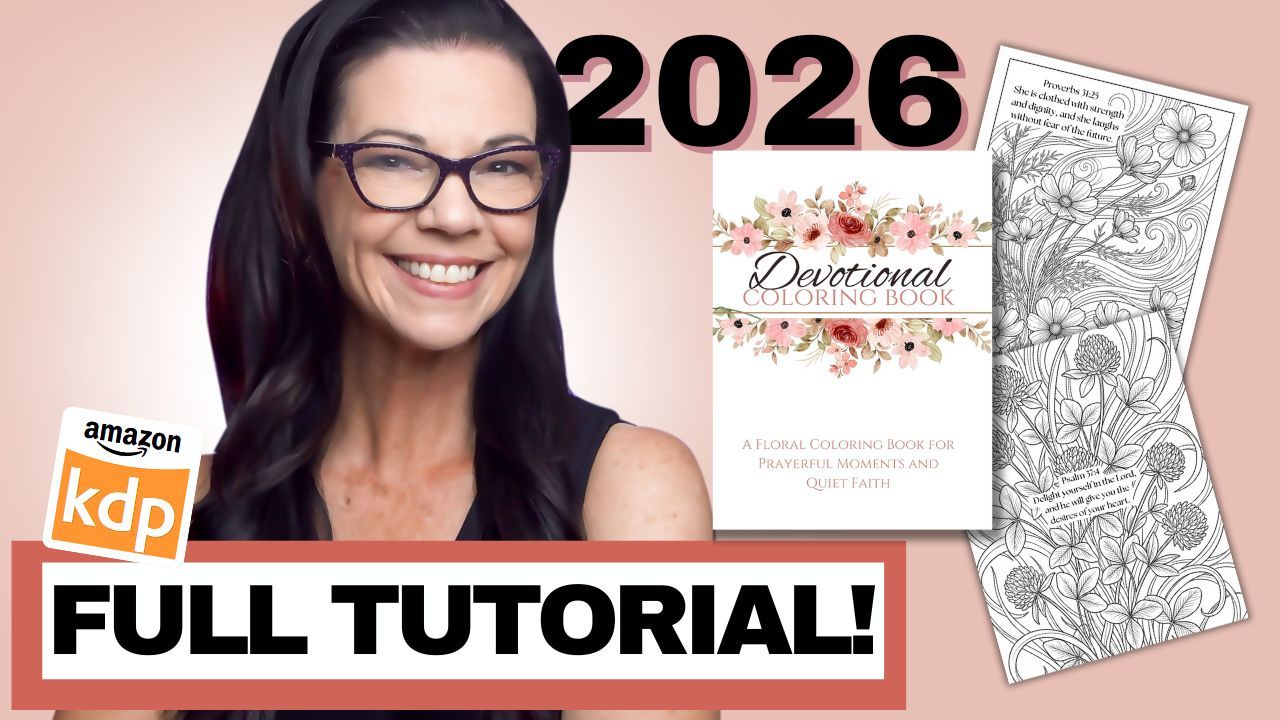
This is the part most people skip.
I originally wanted to make a Mother’s Day coloring book. It sounded like a perfect seasonal idea, and honestly, it is a great gift concept. But when I started researching, Amazon kept waving a red flag and steering me back toward something stronger: coloring books for women.
So instead of forcing the Mother’s Day angle, I followed the data. And once I did, a subniche inside “books for women” kept shining through so clearly that it basically picked itself.
In this post, I’m walking you through the exact process I used to find that subniche, confirm demand, and create the book step-by-step.
Step 1: Start With the Idea, Then Let Amazon Correct You
Because Mother’s Day gifting season is real, I began by searching “coloring books for moms.” And the results were… not great. There weren’t many strong listings, and the search results didn’t feel promising.
More importantly, Amazon kept showing me coloring books for women and essentially assuming the buyer was shopping for a mom anyway.
That was the signal: the audience for “mom” as a title keyword wasn’t big enough to build around. So I adjusted the niche.
Step 2: Shift the Keyword to a Bigger Market (But Still Not Too Broad)
Next search: “coloring books for women.”
That gave me around 40,000 results, which is still a lot. In general, I like aiming for closer to 10,000 results because it’s easier to be found. If you go too broad, you get swallowed.
For example, if you just type “coloring books,” you’ll see over 100,000 results. That’s a sea of books where a new listing can disappear instantly.
So the goal becomes: start broad enough to see patterns, then niche down until the competition is manageable.
Step 3: Look for Repeated Patterns (This Is Where the Niche Reveals Itself)
As I scanned the “coloring books for women” results, I started seeing the same themes repeating:
-
Flowers
-
Bold and easy designs
-
Calm and meditative coloring
-
Girl moments
-
Self-love
-
Mandalas
-
Relaxation and mindfulness themes
Not necessarily “mom” specific, but very giftable and very aligned with what a lot of moms would enjoy.
Then something else started popping up more and more as I scrolled.
Step 4: Spot the Subniche That Won’t Stop Showing Up
Suddenly, I started seeing:
-
Bible coloring books
-
Christian Bible coloring
-
The word devotional
-
Faith-based mindfulness themes
-
“Promises from God’s Word” style books
And it wasn’t just one listing. It kept showing up repeatedly. That’s usually your clue that buyers are actively purchasing in that space.
So I asked a better question:
What’s the market for a coloring book with the word “devotional”?
Step 5: Validate the Niche With Search Volume (And This One Was Better)
When I searched “devotional coloring book,” the results dropped to around 6,000.
That’s the sweet spot.
Less saturated, easier to get discovered, and still clearly active. Some of the top books were spiral-bound and priced high, like $20, but that didn’t bother me. I can still create a version priced around $8 or $9 that meets the same need.
Now I wanted to confirm what these books were actually earning.
Step 6: Use Book Bolt + KDP Spy to Check Revenue
This is where my workflow gets very simple.
I used my KDP Spy (Book Bolt plugin) which comes with a Book Bolt subscription. I let it load results, then sorted by estimated revenue.
And immediately, I saw books in this niche making serious money.
One devotional coloring book was estimated around $20,000/month, and another was around $16,000/month.
That was enough to keep going.
Step 7: Study the Inside of Best Sellers (Don’t Guess)
Next, I clicked into the listings and looked at the interiors because the goal is never to copy, but to understand the format buyers already love.
Here’s what I noticed:
Common interior layout patterns
-
Scripture on the left page
-
Coloring page on the right page
-
Some included perforated edges so pages could be torn out
-
Some mixed in short positive phrases like “Deeply Loved”
I also noticed variety in where the scripture appeared:
-
In the center of the design
-
At the bottom
-
In different placements from page to page
Then I checked reviews.
Step 8: Read Reviews to Learn What Buyers Want
This step matters more than people realize.
Buyers repeatedly said they loved that the designs were:
-
Beautiful
-
Simple
-
Not too complicated
-
Easy to color
-
Faith-filled and calming
That gave me my product requirements:
simple floral art + inspirational scripture + easy coloring experience.
Now it was time to create.
Step 9: Generate 40 Scriptures (Fast)
I went to ChatGPT because I knew I needed scripture selections for the interior.
I asked for 40 positive, inspirational Bible verses focused on:
-
Prayer
-
Joy
-
Faith
-
Strength
This gave me a clean list to work from, and I kept it open because I’d be copying and pasting constantly while formatting the book.
Step 10: Create 40 Floral Coloring Pages (Fast, Consistent, Reliable)
Next, I needed 40 floral coloring pages that matched the style buyers were praising.
I used Lit Pal for this project because it has the most reliable bulk generator I’ve personally used in the last couple of years doing KDP. It also allows you to generate one test page now, which is perfect if you want to preview style before committing.
Inside Lit Pal, I:
-
Entered the title
-
Added my prompt
-
Selected the style (I chose a realistic floral style)
-
Generated 40 pages
The results were exactly what I wanted:
-
Clean line art
-
Complete lines (not broken squiggles)
-
Minimal grayscale
-
Simple but beautiful designs
Then I downloaded them as a PDF.
Step 11: Assemble the Manuscript in Canva (My Time-Saving Hack)
This book ended up being 82 pages because:
-
40 coloring pages
-
40 blank backs (to reduce bleed-through)
-
Title page
-
Copyright page
I use an 8.5 x 11 Canva manuscript template because I make so many books. I duplicate it, then switch to grid view and delete extra pages.
Here’s what was different this time:
Because I uploaded a PDF (not individual JPGs), Canva treated it as a design and gave me an option to apply to all pages.
I tried it and it worked. Huge time saver.
Step 12: Make the Pages Print-Ready (Bleed + Cleanup)
Then I went page by page and did two things:
1) Adjust for bleed
If the artwork runs near the edge, I expand it so it reaches fully to the edge. That prevents awkward white borders or cut-off elements after printing.
2) Remove unwanted color tint
Some images had tiny hints of color. Even though the book will print in grayscale, I still wanted control over the final shading.
So I reduced saturation and lightly adjusted brightness to keep the pages clean.
Step 13: Add Scripture Text Consistently (Then Elevate It)
This part took the most thought.
I debated where to place the scripture:
-
Bottom corner?
-
On the art?
-
A separate text page?
I decided to place scripture on the art for consistency, then realized the text felt too subtle in thumbnail view. So I went back through and elevated the typography:
-
Curved some verses
-
Made some larger
-
Placed some in the center where it fit naturally
It looked better, more intentional, and honestly helped the whole book feel more premium.
Step 14: Build the Cover the Right Way (Using KDP’s Free Cover Calculator)
I used the free KDP cover calculator to get the exact dimensions based on page count and trim size.
Then I:
-
Created a Canva cover design
-
Resized it to the exact KDP dimensions
-
Uploaded the KDP template on top
-
Ensured all important text stayed inside the safe zones (outside the red bleed area)
I chose a floral design that matched the interior theme, changed the text, and modified the layout so the cover was original and compliant.
Step 15: Title + Subtitle Strategy
I checked what other books were naming their devotional coloring books.
The phrase “Devotional Coloring Book” was showing up repeatedly, which told me it’s a common buyer search phrase.
So I used:
Title: Devotional Coloring Book
Subtitle: A Floral Coloring Book for Prayerful Moments and Quiet Faith (example style)
A strong subtitle is where you differentiate.
Step 16: Add Interior Previews on the Back Cover
To make the back cover more effective, I downloaded a few interior pages as JPGs so I could show examples that clearly included scripture placement.
Then I:
-
Added frames
-
Lined them up evenly
-
Rechecked placement against the KDP template
-
Made sure nothing important was too close to trim lines
Step 17: Export Settings
For the cover:
-
Downloaded as PDF Print
-
Used CMYK (best for print)
For the interior:
-
Downloaded as PDF Standard
-
Since it’s black and white line art, the quality was still excellent and not pixelated when zoomed.
Step 18: Upload to KDP and Fix the Common Margin Error
In KDP, I selected:
-
Paperback
-
Black and white interior
-
8.5 x 11 trim
-
Bleed (because the art goes to the edge)
-
Glossy cover finish
During preview, KDP flagged a margin error where a single word was slightly outside the safe zone on a few pages.
This is super common and very easy to fix: just reduce the text size slightly and re-upload.
Once fixed, the preview looked great.
Step 19: Pricing for the Sweet Spot
My goal was to profit around $1.00 to $1.50, which is a sweet spot for me.
KDP gave the minimum price, then I tested:
-
$7.99
-
$8.99
At $8.99, the profit was about $1.66, and since competing spiral-bound books were priced much higher, I still felt competitive.
Then I hit publish.
Final Takeaway: Don’t Force the Niche. Follow the Data.
The biggest lesson here is simple:
I wanted to create a Mother’s Day book.
The market wanted a devotional coloring book for women.
So I followed the data, found a subniche with strong demand and lower competition, and created a book that fits exactly what buyers are already purchasing.
If you build your books this way, your KDP business gets a lot more predictable.
And it gets a lot more fun.